
Smart Kitchen Renovation Guide: Plan Properly, Choose Wisely, Build with Confidence
Introduction
A kitchen renovation often starts with good intentions but can quickly become stressful and costly without precise planning. Whether renovating your kitchen for the first time or upgrading an older one, the process involves more than choosing new colours or buying appliances.
This guide breaks down each step with clarity. It focuses on practical decisions you can apply right away. You’ll avoid delays, prevent common issues, and feel more in control as you move from planning to completion.
Step 1: Plan What You Really Need

Understand Your Lifestyle
Your kitchen should work for how you live, not vice versa. Start by observing how your current kitchen fits into your routine. If you cook daily, you’ll need reliable prep, cooking, and cleaning space. On the other hand, if you mostly prepare quick meals or use pre-cooked food, the layout and equipment needs will differ.
Families often find themselves needing extra storage or better seating, while solo homeowners may value bench space and organisation. Being clear about your household habits will guide every choice that follows.
List Your Priorities
Start with a basic list. Divide it into two parts: what you must have and what would be helpful but not urgent. For example, larger cabinets or a double sink might fall into the first group. A feature like a pull-out pantry or custom splashback might belong in the second.
Avoid being vague. The clearer your list, the easier it will be to make choices when comparing products or fitting items into your budget. A focused plan early on reduces back-and-forth changes later, which can save time and money.
Step 2: Set a Realistic Budget
Know Where Your Money Goes
Kitchen renovations vary widely in cost, depending on the size of the space, the materials chosen, and the number of changes involved. Before you begin spending, break your budget into categories. Include cabinetry, benchtops, splashbacks, flooring, appliances, trades, and final finishes.
Think ahead. Moving the sink or changing wiring costs more than keeping everything in the same place. This matters if you’re trying to stretch a tight budget.
Plan for the Unexpected
Even when everything seems well planned, unexpected expenses can arise. Water damage might be behind old cabinets, outdated wiring, or structural issues. Put aside a portion of your budget—about 10 to 15 per cent—for unplanned costs. This keeps your project moving without panic when something unexpected occurs during demolition or fitting.
You’re not aiming to spend that buffer, but having it ready gives you room to deal with the unknown without changing your entire plan.
Step 3: Plan the Layout and Flow
Understand the Work Triangle
A well-planned kitchen allows you to move from the sink to the stove and fridge without unnecessary steps or obstacles. This is known as the work triangle. Keeping these three points at a sensible distance from one another allows for smoother movement while cooking and cleaning.
It’s a tested design concept that works well in compact and open spaces.
Explore Layout Options
Each kitchen shape comes with its own strengths. An L-shaped kitchen fits into corners and keeps things open. A U-shape gives more storage and bench space. A galley works well in small homes with limited space. An island occupies a larger area and can include extra seating or a spot for guests to gather.
Whichever layout you choose, ensure enough clearance for doors, drawers, and appliances. Movement should feel natural, not crowded.
Open vs Closed Kitchens
Open kitchens create a connected feel with the rest of the house, which works well in modern homes and small spaces. However, they expose everything to view, including clutter. Closed kitchens, by contrast, provide a sense of privacy and reduce noise and smells.
There’s no correct answer—choose what supports your lifestyle best. Think about how your household uses the kitchen now and what you want to change.
Use Kitchen Zones
Dividing your kitchen into zones helps avoid overlapping tasks. For example, a preparation zone near the sink and fridge makes cooking easier. A separate cleaning zone with dishwasher access prevents blockages in movement. Include storage zones for food and equipment so they don’t interfere with your workspaces.
This zoning method allows more than one person to use the kitchen without getting in each other’s way.
Tips for Small Kitchens
In small kitchens, space must work harder. Use full-height cabinets to increase storage. Swap swinging doors for sliding or folding ones. Slimline appliances can provide the same functions with less bulk. Avoid large islands in tight areas; opt for a bench or a movable cart instead.
Corners are often wasted, so install pull-out shelves or carousels to access them easily.
Step 4: Choose Quality Materials and Finishes
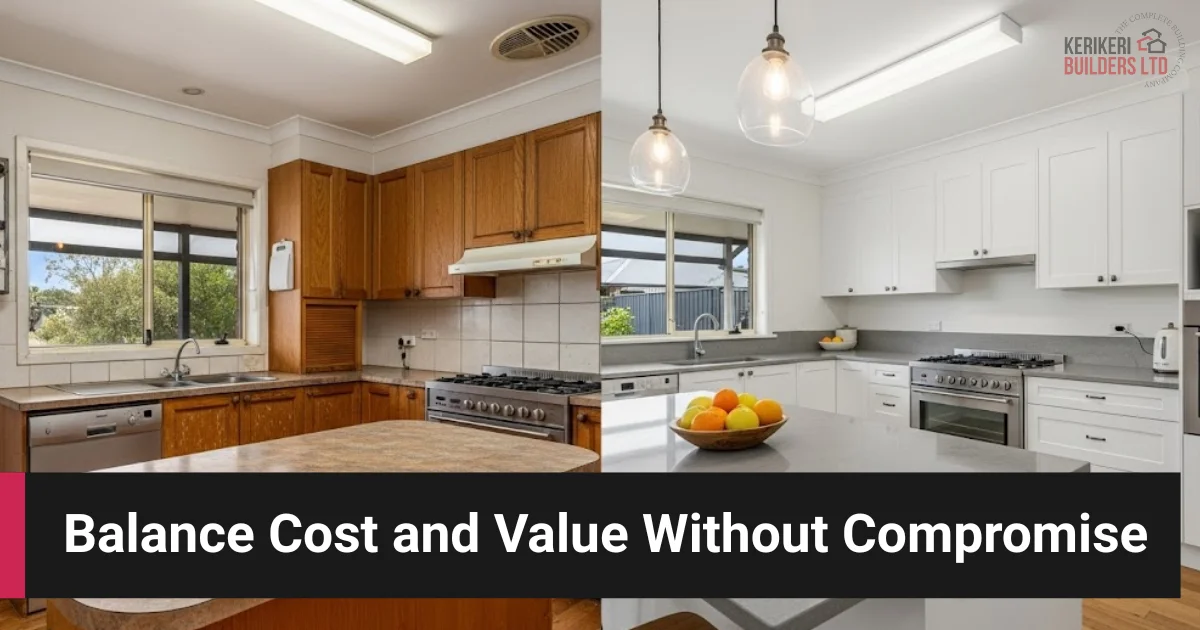
Benchtops
- Laminate remains the most affordable option. It comes in many designs and colours, but doesn’t handle heat or sharp objects well. Use cutting boards and trivets to extend its lifespan.
- Stone offers durability and a long-lasting look. It resists most spills and scratches. Some types need sealing, so check the maintenance requirements before buying.
- Wood brings warmth and natural appeal but needs regular sealing. It can show stains and marks more easily, so consider how much care you want to give.
Cabinets
- MDF is cost-effective and has a smooth finish that suits painted designs. It doesn’t handle moisture well, so it’s better for dry areas.
- Plywood is stronger and more resistant to moisture. It’s a good choice for structural areas like cabinet frames.
- Solid wood gives a traditional look and strong build but costs more and needs maintenance to stay in good shape.
Splashbacks
- Tiles are easy to replace and can add detail to a space. Cleaning grout lines may require more effort over time.
- Glass gives a smooth surface and reflects light, making a kitchen feel brighter.
- Stainless steel is suitable for cooking-heavy spaces. It’s easy to wipe down and handles high temperatures well.
Flooring
- Vinyl offers a soft surface underfoot and resists water. It’s easy to install and clean.
- Tiles last long and handle spills easily. They feel cool, which can be a benefit or drawback depending on your home’s climate.
- Timber adds visual warmth and fits many design styles. However, it can warp or stain if not properly treated.
Step 5: Focus on Practical Use
Smart Storage Ideas
Drawers that pull out fully allow better access than standard cupboards. Use deep drawers for pots, pans, and bulky items. Store small tools and cooking items in the top drawers for convenience.
Add pull-out trays in narrow cabinets and spinning trays in corner units to make full use of awkward spaces.
Tall cabinets can store pantry items or cleaning tools, reducing clutter across bench surfaces.
Plan for Function
Before finalising your design, walk through your daily routine and think about how each area will support it—place power points where appliances will sit, like near the toaster, kettle, or microwave.
Consider fitting a bin inside a cupboard to keep it hidden and reduce floor clutter.
Lighting affects how usable the kitchen feels. Include under-cabinet lights for chopping or food prep areas. Overhead lighting should be even and soft to avoid shadows. Avoid dark corners or overly bright single lights.
Step 6: Work with the Right Experts

Hire Professionals
While some parts of a kitchen renovation can be handled by yourself, certain tasks require licensed trades. This includes plumbing, gas, and electrical work. Find professionals with relevant experience in kitchen projects, not just general construction.
Ask for written quotes that clearly state what’s included. Look at previous jobs or request client feedback to understand how they work.
Stay Involved
Even if you’ve hired skilled professionals, stay involved throughout the process. Ask questions and keep up with progress. Check off each stage so that any errors are caught early.
It’s also a good idea to inspect materials before they’re installed. Mistakes caught late in the job cost more to fix than those addressed early.
Clear communication prevents delays and avoids misunderstandings, especially when working with multiple trades.
Conclusion
Renovating a kitchen involves more than choosing finishes or updating appliances. It requires careful planning, thoughtful design, and attention to both appearance and daily use. A successful renovation fits your lifestyle and improves how your space functions, not just how it looks.
By following a structured approach—starting with a needs assessment, moving into budgeting, and then focusing on layout, materials, and expert help—you reduce stress and achieve better results. Whether updating a worn-out kitchen or building something from scratch, this guide offers a simple way to move forward with clarity and confidence.
